Gensler's easy way to make yogurt
| Powder + 55şC water + thermos |
 |
Powder + water + heater |
| Powder + 55şC water + thermos |
|
Powder + water + heater |
water heaters - thermometers - scales - thermoses - powdered milk - yogurt starters - sweeteners - fermentation time - costs - eating - mug warmers - heating options - thickening - straining - fresh milk - goat yogurt - vegan yogurt - temperature chart
|
probiotic pill + a packet of vanilla-stevia to a 16 ounce thermos. Add 12.8 ounces of 55şC (131şF) water. Shake, wait 8 to 14 hours (shaking the thermos when convenient), open, and eat. |
This is easy, takes little preparation time, costs little, and requires no refrigeration (and so can be done camping). My plan delivers fresh, tasty, high-quality yogurt, with live cultures (important for health), and with just the ingredients you want; and it can be customized in many ways. Below I'll list DETAILS about what equipment I use.Mixing the powders beforehand simplifies the process. In a large jar, mix 8 ounces of powdered milk, the contents of one probiotic pill, and four vanilla-stevia packets - and shake the jar well; call this mixture EP (enhanced powder). Then the process goes as follows:
easier thermos yogurt
Add 3.2 ounces of EP powder to a 16 ounce thermos. Add
12.8 ounces of 55şC (131şF) water. Shake, wait 8 to 14 hours
(shaking the thermos when convenient), open, and eat.
You can customize this to suit your preferences. For example, you can change or eliminate the sweetener. You can vary the powder/water ratio (which here is 1/4 and gives thick yogurt). You can vary the powder+water total (which here almost fills the thermos but leaves a little room to shake the contents); but be sure to fill or almost fill the thermos (to keep the heat in better). Or you can make a larger quantity of the EP mixture (using one pill for every eight ounces of powdered milk and every four vanilla-stevia packets); you can even add the two other powders to the container that the powdered milk came in (and then shake to mix the powders thoroughly).The EP mixture makes it easier to figure out the proper amount of powder and 55şC (131şF) water to add for different size thermoses. Here's a chart with examples (all quantities are in ounces - so the third row is what we used for a 16 ounce thermos):
thermos powder 55şC water 8 1.6 6.4 12 2.4 9.6 16 3.2 12.8 24 4.8 19.2 32 6.4 25.6 40 8.0 32.0 68 13.6 54.4 x 0.2x 0.8x
So if you want to make x ounces of yogurt using a powder/water ratio of 1/4, then use .2x ounces of EP powder and .8x ounces of water - and use a thermos of that size or slightly larger. Don't use so much liquid that it overflows and makes a mess when you tighten the thermos cap.If you'd prefer to add 55şC (131şF) fresh (liquid) milk to your thermos instead of water, cut the amount of EP powder in half and follow this chart (again all quantities are in ounces):
thermos powder 55şC milk 8 0.8 7.2 12 1.2 10.8 16 1.6 14.4 24 2.4 21.6 32 3.2 28.8 40 4.0 36.0 68 6.8 61.2 x 0.1x 0.9x
For me, the yogurt tastes the same using either hot water or hot milk; I tend to use whichever is more convenient at the moment.Now we'll get into DETAILS about equipment (I include Amazon links), with further comments and options. Beginner can skim or skip many of my numbered comments.
- I heat the water with a small electric kettle (B0086UJQN8 or B008YQLZOW).
- Or you could use a microwave, a regular stove, or a campstove. If you regularly use a microwave to heat a certain amount of liquid to 55şC (131şF), you may want to mark down how many seconds this takes.
- In some cases, hot tap water may be warm enough.
- I use a digital thermometer (B013A81VW4) to measure the temperature; this hangs on the wall next to my sink, and I can put its probe into the water or the yogurt.
- Water above 55şC (131şF) may kill the good bacteria. If your water is hotter than that, then add a little cold water to bring down the temperature. Measure the water temperature; don't just guess.
- For travel, a smaller digital thermometer may be better (B01IHHLB3W or B01LET2BFC).
- I use a small digital scale (B000O37TDO or B00GS8GJGW) to measure the amount of powder and water.
- While I give amounts in ounces, you could convert these to grams, cups, tablespoons, or whatever.
- I use a 16 ounce Stainless Steel King Thermos (B0017IFSIS).
- This is a good quality thermos (it's claimed to keep food hot for 7 hours) and keeps the yogurt warm long enough to ferment. Use a good quality thermos that's truthfully claimed (some manufacturers exaggerate - I trust Thermos brand) to keep food hot for at least 6 hours.
- I use a bottle brush (B002BXOIOS) to hand-wash the thermos afterwards.
- Never use a stainless-steel thermos in a microwave.
- When I started making yogurt, I'd first preheat the thermos with boiling water (then pouring it out) and cover the thermos with an insulating cover (or a jacket) to preserve heat. But I found that, with 55şC water, this extra work made little difference, and so I now usually skip preheating and covering; but these extra steps may be more helpful when making yogurt outside in cold weather while camping.
- You can use different size thermoses:
- LunchBots makes perhaps the best 8 ounce and 12 ounce thermoses (B01DTHPIO8 and B00RPI9VH8).
- I've also used 24 and 32 ounce Thermoses (B008JC76XA and B06XKDS334).
- Thermos makes even bigger units of 40 or 68 ounces (B0017IHRNM or B008YB4V52), and these should work too.
- With small thermoses (like the 8, 12, and 16 ounce units mentioned above), it's important to heat the initial water (or milk) to a full 55şC (131şF). With larger thermoses, which tend to keep things hot longer, you can usually use lower temperatures - but not so low that the liquid drops below 40şC (104şF) after 12 hours of fermentation.
With these larger thermoses, you might mark down how many seconds your microwave takes to heat a given amount of water (or milk) to somewhere in the middle of the desired temperature range (e.g., 52şC (126şF)), and then just set your microwave to this many seconds each time.
- My 24 ounce Thermos (B008JC76XA) works fine if the initial water (or milk) is in the 50ş-55şC range (122ş-131şF).
- My 32 ounce Thermos (B06XKDS334) works fine if the initial water (or milk) is in the 48ş-55şC range (118ş-131şF).
- I use Nido Fortificada powdered whole milk (B00FRFRZF6).
- Or you could use Carnation powdered non-fat milk (B004VITI0K), or another powdered milk. While non-fat milk produces a slightly thinner yogurt, the 1/4 ratio of powder/water still works well.
- Powdered milk requires no refrigeration (until you mix it), requires no preheating, makes it easier to produce thicker yogurt (using a high powder/water ratio like 1/4), produces yogurt that tastes just as good, is easier to use, and is usually cheaper. So it's often more convenient to use powdered milk when making yogurt. But it's also possible to use fresh (liquid) milk together with powdered milk in various ways (as with a thermos or mug warmer).
- The nutritional data of your yogurt (total calories, protein-fat-carb distribution, calcium, iron, etc.) resembles the nutritional data of the milk you use. Nido powdered milk, for example, per ounce of powder has about 160 calories, 9g of fat, 11g of carbohydrates, and 7g of protein. But fermenting changes consistency and taste; and, most importantly, it adds good bacteria that promote your health (search for "probiotic benefits").
- I use NewRhythm Probiotic Pills (B071DZQLPQ) for the yogurt starter.
- Each NewRhythm pill has 25 billion bacteria with 20 different strains. It's good to have many beneficial strains; most commercial yogurts have only 2-5 strains, and sometimes all the bacteria are dead. These particular pills are shelf stable, and so require no refrigeration.
- It's overkill to use ONE NewRhythm pill to make 16 ounces of yogurt; 1/4th of a pill works just as well. (I've had success down to 1/16th of a pill; bacteria multiply exponentially and may double every 20 minutes.) It's difficult to pour out 1/4th a pill; it's easy to pour out 1/2 of a pill - but the powder will cake up (but still work) if you keep the other half for later. The EP (enhanced powder) process solves this problem by mixing a pill's contents with 8 ounces of milk powder.
- You could try other probiotic pills (which may or may not work to make yogurt) or commercial yogurt starters; aim for ones that are shelf stable (need no refrigeration) and have lots of bacteria with many strains. I've had success with these:
- Dr. Tobias Deep Immune Probiotics (B00WZ4VQ52): 4.4 billion bacteria and 4 different strains, takes a little longer to ferment, make EP powder using 2 pills for every 8 ounces of powdered milk - and make SS powder using 2 pills for every four vanilla-stevia packets.
- I'll add to this list of yogurt-starter powders as I try more options.
- You can instead use a tablespoon of existing plain yogurt (homemade or commercial) for a starter to make new yogurt - and you can put some of your new yogurt aside in a "yogurt starter" jar in your refrigerator for future yogurts, and keep repeating this process, putting aside new starter each week. You could make yogurt for years, using just this one starter source to begin the process. But it's simpler to use fresh powdered starter each time, as I do.
- I use a NOW Better Stevia French Vanilla packet (B00FRJWMOG) for sweetener. It doesn't seem to matter whether you add it before or after the fermenting.
- You might prefer a different amount or kind of sweetener, or no sweetener at all. The yogurt tastes good to me with no sweetener, but a little better with sweetener.
- If you don't like the vanilla-stevia packets, you could try substituting other packets, for example: just stevia (B0014UAHQM or B0792GPPHX), Splenda (B000F3N7AC), or Truvia (B0025UC2DQ). Or you could spoon out a certain amount of powder in place of a packet, for example: stevia (try 1/32nd of a teaspoon B00DSQZNF0), Swerve (try 1.5 teaspoons B0079OYIFS), erythritol (try 2 teaspoons B075MGQFF6), or coconut sugar (try 2 teaspoons B01N33WO1X). Or you could use xylitol (try 1.5 teaspoons B0013P3KC6), which produces good yogurt despite xylitol's reputation for killing some bacteria (or maybe just killing some bad bacteria?). Some of these options are less expensive than the vanilla-stevia packets.
- You could even add sugar AFTER the fermenting, which would make your yogurt as unhealthy as most commercial yogurts. For more information, search for "why added sugar is bad," "added sugar versus natural sugar," and "low glycemic diet." Honey is almost as bad. For more on healthy eating, search for "Dr. Jason Fung"; I recommend his YouTube https://www.youtube.com/watch?v=YpllomiDMX0 series on "The Aetiology of Obesity," which is really about healthy eating.
- The exact fermentation time (how long you heat your yogurt) isn't very critical.
- I say to heat the yogurt "from 8 to 14 hours." At least heat it until it noticably thickens, which generally takes about 8 to 10 hours. It doesn't matter much if you heat it beyond this, up to 14 hours or longer.
- Because the bacteria tend to double in number every 20 minutes until the nutrients run out, this "noticable thickening" happens fairly suddenly. After this point, there will be much less increase in bacteria and much less further thickening.
- Some say that excessive fermentation time (heating it long after it's thickened) makes the yogurt bitter; but I haven't noticed this. The thermos method would tend to lessen this effect, since the liquid cools down after many hours.
- I usually mix my yogurt before I go to bed and then eat it the next day, usually with breakfast, lunch, or dinner. It can keep up to about 24 hours without refrigeration - and so I seldom refrigerate my yogurt.
- Costs are low.
- Using current prices, the milk powder + probiotic + sweetener for 16 ounces of yogurt comes to $1.09 (87.4 + 8.1 + 13.6) using the EP method. This is about 6.8˘ per ounce.
- Single-serving commercial yogurts are usually labled as 5.3 ounces (although they often weigh out to be less); making 5.3 ounces of yogurt costs 36˘ (5.3 * 6.8).
- While the yogurt is delicious to eat just as it is, you could also add berries, fruit, chia seeds, flax meal, muesli, granola, nuts, or whatever; yogurt+muesli is a great breakfast, and yogurt+cashews is a great snack.
- Or make a smoothie using the yogurt; my favorite adds broccoli sprouts (see Rhonda Patrick's video about sulforaphane) and perhaps other things.
- Or make frozen yogurt. If you just freeze your homemade yogurt, it will turn into solid ice, which is hard to eat; to counteract this, you can mix every three parts of homemade yogurt with one part xylitol (B010TSOACG) or coconut sugar (B01N33WO1X) - and perhaps remove your creation from the freezer a little before you'll eat it. Or you can do something more ambitious, perhaps adding berries or fruit or whatever and running this through a blender (B004P2OLB8) or a full-fledged ice cream maker (like B003KYSLMW).
- You can use a mug warmer instead of a thermos.
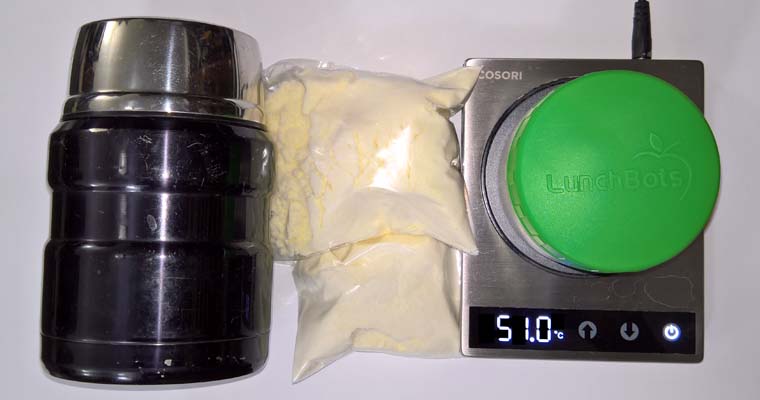
- You can use an 8 ounce LunchBots non-insulating stainless steel food jar (B01ETHPMHK) and a Cosori mug warmer (B074NYJL9J is just the warmer while B07G9J4745 also has a Cosori mug):
mug warmer yogurt
Add 1.6 ounces of EP powder and 6.4 ounces of water (it needn't
be heated) to an 8 ounce LunchBot non-insulating jar; shake well.
Put the jar on a Cosori mug warmer set to 50şC (122şF). Wait 8
to 14 hours (shaking the jar when convenient), open, and eat.
The 50şC (122şF) Cosori setting keeps its heating plate at that temperature; the yogurt temperature will be cooler and ideally in the 42°-46°C (108°-115°F) range. If you don't have a scale handy, add six slightly rounded tablespoons of powder and then almost fill the jar with water. You can adjust the amounts of water and powder to produce different amounts of yogurt - and you needn't keep the jar filled or almost filled (unlike with the thermos method):
powder water yogurt yield in ounces 1.6 6.4 8 (maximal yield) 1.1 4.2 5.3 (like commercial packages) 1 4 5 (simple, room for berries)
- You can take the jar off the mug warmer when the yogurt has thickened, typically in about 8 to 12 hours. The yogurt can be refrigerated in the same container; or you can keep it unrefrigerated up to about 24 hours from starting the process. This method uses minimal equipment to easily produce individual yogurt servings and should be ideal for students in a dorm room; and the little yogurt jar fits in your pocket! If you're traveling and want to make fresh yogurt every day, all you need is the jar, the mug warmer, a spoon, and various small EP bags (several should fit in the jar). You could also add a small bag of nuts or raisins to put in the yogurt - yummy and healthy!
- While the mug warmer can warm the water you put in, it would speed the process by perhaps an hour if you first warmed this water, but not over 55şC (131şF). Don't substitute a cheaper mug warmer that doesn't let you set the temperature; these get too hot and would kill the good bacteria - even units that claim to limit the heating-element temperature to 55şC (131şF) get much hotter than that.
- The 4 ounce LunchBot jar works well for smaller quantities (B01ETIP82I); just cut in half the powder and water (e.g., to 0.8 and 3.2 ounces), and set the Cosori to 48şC (118şF). The 16 ounce Klean Kanteen stainless steel food jar works well for larger quantities (B00BFZH43K); just double the powder and water (e.g., to 3.2 and 12.8 ounces), and set the Cosori to 54şC (129şF).
- With even larger food jars, you may need to increase the Cosori setting to 55şC (131şF) or higher; try to keep the fermenting yogurt inside close to 42°-46°C (108°-115°F) and never over the bacteria-killing 55şC (131şF). While testing a new setup, open the jar occasionally to test the temperature; when you find a setup that works, try to minimize opening the jar during fermentation (since it cools the yogurt and, if you insert a temperature probe, makes a mess).
- The Cosori mug (B07G9J194H), which is optimized to work with the Cosori mug warmer, works well to make 12 ounces of yogurt. Use 2.4 ounces of EP powder and 9.6 ounces of water, stir instead of shaking, use the lid, and set the Cosori to 51şC (124şF).
- There are other non-thermos options to keep the yogurt at a somewhat constant warm temperature not higher than 55şC (131şF).
- For making large quantities of yogurt, an Instant Pot is convenient. Get a DUO with a YOGURT button, with a capacity of 3 quarts (B06Y1YD5W7), 6 quarts (B00FLYWNYQ), or 8 quarts (B01B1VC13K). Use 6.4 ounces of EP powder and 26.6 ounces of water for every 32 ounces (quart) of yogurt you want, hit the YOGURT button just once (putting it into the "normal" or "Yogt" mode), and press + / - to set fermentation time to perhaps 12 hours. (The "26.6 ounces of water" is an ounce more than for fermenting in a closed container, and adjusts for evaporation.)
- For camping in the desert, I'm going to try using the the sun with a collapsible black water bottle (B07BMKNRWG).
- Or you might try an oven set very low (or OFF after being heated to 55şC (131şF)), a cooler filled with warm water, a dedicated yogurt maker, or a sack resting against your horse (like Attila the Hun used - the yogurt helped make his soldiers into mighty warriors).
- You can use various thickening strategies.
- A Viscosity Cup (B00IL7DVNW) can measure your yogurt's thickness; time how many seconds your liquid takes to drain out of the hole on the bottom and divide by how many seconds water takes to drain out (which for my cup is 7 seconds). With your baby finger over the hole, pour yogurt from your jar into the cup to almost fill it; then release your finger to let the yogurt drain back into the jar (and shake or stir the jar a little if the flow stops). The thickness (relative to water) = how many seconds your liquid takes to drain, divided by 7 (or however many seconds water takes to drain). So water by definition has a 1 thickness (7/7). Aim for a yogurt thickness, at the temperature you'll eat it, of at least 4 or 5.
- With powdered milk, a higher powder/water ratio (more powder or less water) makes thicker yogurt. Using my suggested 1/4 ratio, yogurt at 40şC (104şF) has a high 67 thickness (469/7, the yogurt drips out very slowly); when cooled to 10şC (50şF) it's too thick to drain through the hole (and so has no thickness number). A 1/5 yogurt at 40şC has a much lower 2 thickness (14/7), but when cooled to 10şC thickens to a fine 35 thickness (245/7). A 1/8 yogurt (which follows the usual powder/water ratio for making milk from powder) at 40şC has a watery 1.04 thickness (7.3/7), but at 10şC has a marginal 3.5 thickness (24.3/7).
- Milk with higher fat content (like powdered or fresh whole milk) - which I prefer - tends to make somewhat thicker yogurt. Or add some thick cream (often marked as "36%") to your milk, to make the yogurt much thicker.
- You can also use TP (thickening powder) to thicken your yogurt. In a large jar, use equal parts of instant clear jel powder (I suggest Hoosier Hill Farms B008GHRYIK - make sure to get the instant kind and not the kind that requires cooking - this is made from corn starch) and powdered erythritol sweetener (I suggest So Nourished no-calorie all natural sugar substitute B07CVPF4X2 - this is intended here more to provide bulk, so that the instant jel powder doesn’t clump together, than to add sweetness). You'll also need a stainless steel mixing ball B071YMZJQY. With your yogurt in a jar, add a mixing ball and 2 or 3 level tablespoons of TP powder for every 8 ounces of yogurt to the top; don’t bother to stir it in with your spoon (this just adds a gummy mess to your spoon that’s hard to clean off). Put the top on the jar and shake the jar for 20 or 30 seconds. Put it aside for 10 to 20 minutes, and then shake it again. If it’s still not thick enough, you can add more powder and repeat the process.
- Here's what I do to make very thick yogurt, the consistency of cheese yogurt (see next section), and just enough of it to spread nicely on on the slices or pieces from a single apple or orange. After making your yogurt, pour 2.5 ounces of it into a 4 ounce LunchBot B01ETIP82I, add a small stainless steel mixing ball B07D1HFPBM, add 1.5 level tablespoons of TP powder (as described in the last paragraph). Put the top on the jar and shake the jar for 20 or 30 seconds. Put it aside for 10 to 20 minutes, and then shake it again. Then take the top off and remove the mixing ball (use a knife or chopstick to remove the thick yogurt from inside the ball). Refrigerate if desired, and then use it to spread on the slices or pieces from an apple or orange.
- You can also thicken yogurt using gelatin, tapioca starch, or agar agar powder; but the TP powder for me seems to work the best.
- After fermenting, you can strain your yogurt to remove some of the whey liquid.
- While you can use cheese cloth or a coffee filter, it's easier and less messy to use a commercial strainer, like the Donvier Yogurt Cheese Maker (B000064841). Straining adds no protein but eliminates healthy whey liquid that's lower in protein (so strained yogurt has a higher protein percentage); you can use the whey liquid for something else (I often add it to a smoothie) or else throw it away.
- Strain only yogurt that's already fairly thick; otherwise, it'll mostly drip through and you'll end up with only a tiny amount of strained yogurt. Strained yogurt has no defined thickness number using my viscocity-cup method, since it's too thick to drain through the viscocity-cup hole.
- Strained yogurt, depending on how long you strain and how much whey liquid you remove, conventionally divides into Greek yogurt (pretty firm) or yogurt cheese (even firmer, like whipped cream). Straining 5.3 ounces of commercial Chobani plain Greek yogurt for 10 hours removes an additional 1.3 ounces of whey liquid and yields firmer yogurt cheese.
- If I strain 20 ounces of my homemade yogurt using the Donvier at room temperature (not in my refrigerator), and keep pouring out the whey liquid, this is how much the strained yogurt weighs at various times:
straining time yogurt ounces 0 (start) 20 15 minutes 15.54 30 minutes 14.35 45 minutes 13.50 1 hour 12.86 2 hours 11.48 3 hours 10.77 4 hours 10.33 5 hours 10.09 6 hours 9.88 7 hours 9.70 8 hours 9.56 9 hours 9.44 10 hours 9.34
Straining for an hour gives roughly the consistency of commercial Greek yogurt. Straining for 6 to 10 hours gives very thick yogurt cheese, and any further straining makes little difference.- Highly strained yogurt cheese is high in protein and spreads nicely on English muffins, crackers, celery, baby carrots, or pumpkin pie. A large piece of pumpkin pie requires about 5 ounces of yogurt cheese, using a generous amount.
- I need to experiment with mixing yogurt cheese with sugar-free jams, to enhance the flavor. And I need to experiment with freezing yogurt cheese to make frozen yogurt, perhaps adding cocoa and using ice-cube trays.
- I tend to strain yogurt only to make yogurt cheese, since my unstrained yogurt is already thick enough to use with cereal, berries, nuts, or smoothies.
- I like to spread yogurt cheese on apple slices (first cutting the apple into eights), which requires only a couple ounces of yogurt cheese. To create such a small amount, devices like the Donvier Yogurt Cheese Maker are overkill; it's more convenient to use a small stainless steel tea infuser (like (B01LQ7NQTW or B012T8SX1I). Set the infuser over a coffee mug (to catch the whey liquid, which you'll have to dispose of from time to time), fill the infuser with homemade or commercial yogurt (about 5 or 6 ounces), wait about 8 to 10 hours until the yogurt forms very thick yogurt cheese, and then spread the yogurt cheese on your apple slices. If "an apple a day keeps the doctor away," then adding high protein yogurt cheese should work even better. If you want to use the infuser to make even more yogurt cheese (up to about five ounces), then keep filling up the infuser to the top as the whey liquid drains out and gives you more room in the infuser.
- You can use fresh (liquid) milk with a mug warmer (instead of a thermos).
- You can use fresh milk (whole milk or non-fat milk or anything in between) with an 8 ounce LunchBots non-insulating stainless steel food jar (B01ETHPMHK) and a Cosori mug warmer (B074NYJL9J is just the warmer while B07G9J4745 also has a Cosori mug):
fresh milk yogurt (using some powdered milk)
Add 8 ounces of refrigerated milk to an 8 ounce LunchBot
non-insulating jar. Add a rounded tablespoon (0.5 ounces)
of EP powder. Shake well. Remove the lid and put the jar
on a Cosori mug warmer set to 54şC (129şF). Wait 8 to
14 hours (stirring the liquid when convenient) and eat.
Brewing in an open jar (with the lid removed) will evaporate about a half ounce of water in 12 hours; this thickens the yogurt a little. To compensate for the greater heat loss, increase the Cosori temperature to about 54şC (129şF). I sometimes leave the temperature probe in the open jar, use it to stir the liquid, and use the temperature readings to find a single setting (like 54şC (129şF)) that keeps the yogurt during fermentation as far as possible in the 42°-46°C (108°-115°F) range but never higher than 55şC (131şF). As before, while the mug warmer can warm the milk you put in, it would speed the process by perhaps an hour if you first warmed this milk, but not over 55şC (131şF).- The EP powder controls thickness; using 0.5 ounces of EP for every 8 ounces of fresh whole milk gives a nice 8 thickness (56/7) at 40şC. But using this little EP adds less sweetener than does the 1.6 ounces used to make the same amount of yogurt using only milk powder; if you have a problem with this (I don't), add more sweetener to the yogurt.
- With an open jar, you'll get floating milk skin. Either break it up and stir the pieces into the liquid (adding the high-protein skin doesn't affect taste and minimally affects texture) or else remove it (if you don't like how it looks or feels). When measuring yogurt thickness using a viscosity cup, remove milk skin, since it clogs the viscosity cup's hole and distorts measurements. If you hate milk skin, brew your fresh-milk yogurt in a closed jar, use the 50şC (122şF) closed-jar Cosori setting, and increase the EP powder to 0.8 ounces for every 8 ounces of fresh milk - which provides a 6 thickness (56/7) at 40şC.
- You can modify these directions to brew from 4 to 16 ounces of yogurt at a time using an open jar (or pitcher or bowl) on the Cosori, using 0.5 ounces of EP powder for each 8 ounces of fresh milk, with a:
All of these are stainless steel or silicone; I don't recomment plastic jars, since their thermal conductivity is low. I often use a stainless steel chopstick (B00W8APX1G) to stir the yogurt, leaving it in the open jar while fermenting.
- 4 ounce LunchBot (B01ETIP82I), set the Cosori to 52şC (126şF).
- 16 ounce Klean Kanteen food jar (B00BFZH43K), set the Cosori to 56şC (133şF).
- 12 ounce milk pitcher (B016ZOFTGY): set the Cosori to 54şC (129şF), use 8 ounces of milk.
- 20 ounce milk pitcher (B013WDXNYQ): set the Cosori to 56şC (133şF), use 16 ounces of milk.
- 12 ounce collapsible silicone bowl (B019B5LISW): set the Cosori to 56şC (133şF), use 8 ounces of milk - and perhaps later add cereal to the bowl to make a nice breakfast.
- 16 ounce sierra cup (B003SQ0ECW): set the Cosori to 54şC (129şF), use 12 ounces of milk. Since the wide top promotes evaporation (about 2 ounces in 12 hours), you can get away with using only 0.5 ounces of EP powder for the 12 ounces of milk.
- The Cosori mug (B07G9J194H), which is optimized to work with the Cosori mug warmer, works well too. Use 0.75 ounces of EP powder and 12 ounces of milk, stir instead of shaking, keep the lid off, and set the Cosori to 55şC (131şF). This is my GOTO method, the method I use most, brewing on two Cosoris at the same time (and so making 24 ounces of yogurt); to minimize the powder sticking on the bottom, rub the stainless steel chopstick a little on the bottom of the mug when you occasionally stir the yogurt.
- It's possible to avoid powdered milk entirely (while keeping the yogurt thick) by either adding evaporated milk or thick cream to the fresh milk or by evaporating some water out of the fresh milk before fermentation; but these methods require much more work. If you want to try such methods, I suggest that you use a special SS (super starter) powder. In a small jar, combine one NewRhythm probiotic pill (a tiny amount) with four vanilla-stevia packets (about a teaspoon total); and then use 1/8th teaspoon of this SS powder for each 8 ounces of yogurt.
- You can use milk from animals other than cows.
- I've made goat milk yogurt using Meyenberg Powdered Whole Goat Milk (B004K69OMU), an 8 ounce LunchBots non-insulating stainless steel food jar (B01ETHPMHK), and a Cosori mug warmer (B074NYJL9J):
goat milk yogurt
Add 2 ounces of powdered goat milk + 1/8th
teaspoon of SS powder + 4 ounces of water (it needn't
be heated) to an 8 ounce LunchBot non-insulating jar;
shake well. Put the jar on a Cosori mug warmer set
to 54şC (129şF). Wait at least 20 hours (shaking the
jar when convenient), open, and eat.
Since goat yogurt tends to be thin, I raised the powder/water ratio to 1/2 to get an acceptable 5 thickness (35/7). It takes a long time for the yogurt to thicken, perhaps 22 hours; and so I advise against the thermos method, which likely wouldn't keep the heat that long. Since milk skin is a big problem if you use an open jar, I'd also advise against this. Since goat milk gasses a little when fermenting, you might want to unscrew the lid a little occasionally to let out gas. To me, goat yogurt tastes salty and not as good; but it may have advantages for some people, despite being more expensive. Powdered goat milk also comes in a nonfat version (B004ZWK1FI).- Yogurt has also been made from the milk of horses (B07F8B9CW4), camels (B073XP4FJT), sheep, buffaloes, yaks, and other mammals - all of whom, even whales, give milk.
- You can make vegan yogurt from strictly plant sources.
- I've made vegan yogurt using liquid Silk Original Soymilk (B004HK7NT0), powdered soy milk (B003J4M8HW), an 8 ounce LunchBots non-insulating stainless steel food jar (B01ETHPMHK), and a Cosori mug warmer (B074NYJL9J):
vegan soy milk yogurt
Add 6 ounces of liquid soy milk (it needn't be heated) to
an 8 ounce LunchBot non-insulating jar. Add 2 rounded
tablespoons of powdered soy milk + 1/8th teaspoon of
SS powder; shake well. Remove the lid and put the jar on
a Cosori mug warmer set to 54şC (129şF). Wait 8 to 20
hours (stirring the liquid when convenient) and eat.
Since soy milk gasses a lot when fermenting, brew it in an open container instead of a closed thermos or jar; to compensate for the greater heat loss, increase the Cosori temperature to about 54şC (129şF). To keep the soy milk from bubbling over while fermenting, use only 6 ounces of liquid soy milk. The two rounded tablespoons of powdered soy milk (1/2 ounce) produce thicker yogurt, of ??? thickness; without this, the yogurt comes out too thin.- Silk Original Soymilk is aseptic (no bad bacteria and you needn't refrigerate before opening) and so doesn't have to be preheated to 180şF (82şC) to kill off bad bacteria. While it has a moderate amount of added sugar, most of this gets eaten by the bacteria and transformed into lactic acid. I haven't tried Silk Unsweatened Soymilk (B004HK7NTA), which, to feed the bacteria, may require adding something like coconut sugar (B01N33WO1X), which is healthier than regular sugar and has a lower glycemic index.
- I've tried cutting out the liquid soy milk and instead using only powdered soy milk (B003J4M8HW or B019CVC640) or powdered coconut milk (B00M8M2SKS). So far I've been unsuccessful; I couldn't get the yogurt to thicken - even after adding coconut sugar or regular sugar to feed the bacteria. E-mail me if you figure out how to make vegan yogurt using only powder.
- There are "milks" made from other plant sources, including almonds (B004LL7GHO or B016LBC8EC), cashews, macadamia nuts, walnuts, hemp, flax, and rice. Many or all of these could produce yogurt.
- You may find this temperature chart useful (note the different Cosori temperature settings for closed and open jars).
item closed open above this kills bacteria 55şC (131şF) ideal fermenting 42°-46°C (108°-115°F) 4 ounce LunchBot 48şC (118şF) 52şC (126şF) 8 ounce LunchBot 50şC (122şF) 54şC (129şF) 16 ounce Klean Kanteen 54şC (129şF) 56şC (133şF) 17 ounce Cosori mug 51şC (124şF) 55şC (131şF) 12 ounce pitcher 54şC (129şF) 20 ounce pitcher 56şC (133şF) 12 ounce silicone bowl 56şC (133şF) 16 ounce sierra cup 54şC (129şF)
I (Harry Gensler) got interested in this when I decided to eat more yogurt after medical treatments disturbed my gut bacteria and digestion. But making yogurt was so much fun that I made it a hobby! I use many ideas from the Web (for example, the unconventional idea to shake or stir yogurt during fermentation is based on a scientific study) - and give, I believe, the easiest ways to make your own yogurt. E-mail me to harrygensler@gmail.com if you have further ideas to add to this page. This page is cloned on two sites: http://www.harryhiker.com/yogurt.htm and http://www.harrycola.com/yogurt.htm.